The Easy Guide To Teaching Logic Gates
The non-specialist teachers' easy guide to teaching logic gates
Imagine a world where light switches aren't just simple toggles, but decision-makers that respond to your every whim. Think of a universe where everyday technology works on an incredibly simple secret code, deciphered only by those who understand the language of logic gates.
As computer science teachers, we stand at the threshold of an extraordinary journey—a journey where we unveil the magic behind the machines, where we empower young minds to wield the power of binary sorcery.
In this blog, we dive into understanding logic gates and truth tables, unlocking the gateway to digital decision making and explore how you can confidently teach logic gates and truth tables to your pupils, even if you are a non-specialist.
Understanding logic gates
OK, let’s start with the basics. All digital devices and computers rely on logic gates to process information, making them a vital topic for computer science students to grasp. Logic gates are simple electronic circuits with either 1 or 2 inputs and a single output. These inputs and outputs are represented using TRUE or FALSE, which is commonly written as 1 (for TRUE) and 0 (for FALSE). These represent if an electrical current is present or not.
There are three basic logic gates:
AND
OR
NOT
There are others which we’ll be looking at later, but they are based on these original three.
NAND (this is a NOT and an AND)
NOR (this is a NOT and an OR)
Exclusive OR often written as XOR (this is similar to an OR but slightly different)
Exclusive NOR often written as XNOR (this is a NOT and an Exclusive OR)
But why should students bother learning about logic gates?
Our world is quickly being filled with digital technology that help our day to day lives. By studying computer science, we are helping pupils understand this developing world.
Logic gates are the very backbone of how computers make decisions. They take a simple input and run it through a logic gate on a circuit board and get an output. It is how the hardware works.
Learning how these logic gates work, helps pupils understand how the hardware and software work together and how simple computational thinking really is.
Explaining logic gates
In order to understand the logic pupils should be familiar using ON/OFF, TRUE/FALSE and 0 and 1 in their explanations. They all are different names to represent the same thing; if an electrical current is present or not.
In fact, they are all so common they are often used interchangeably. Therefore, throughout this post I too will be alternating the terminology to help you get used to it.
If this concept of a current being present or not is completely alien to you, may I suggest you first read my post “An easy introduction to binary for non-specialist computing teachers”.
AND logic gate
The AND logic gate is drawn as follows:
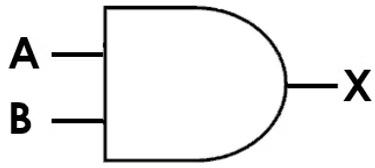
Here we have two inputs (A and B) and one output (X). The gate is in the middle and in an AND gate the gate looks like the letter D as shown at the end of the word AND, which helps make it easier to remember (a good tip to pass on to your students!).
Let’s change the inputs to see how the output will be affected. First what happens when both of the inputs are FALSE (0) which means there is no electrical current from either input.
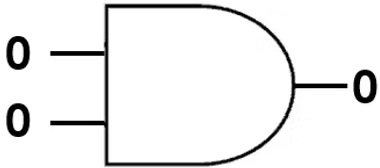
As you can see, with an AND gate if neither of the inputs (A and B) has a current there will be no current for the output (X). Now let’s change it to the only B has a current but A doesn’t.
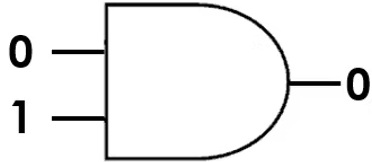
Again, in this instance the output (X) will still be 0. How about if B is 0 but A is 1?
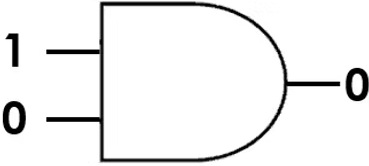
Again, the output will be 0. Finally, what happen when both A and B have a current?
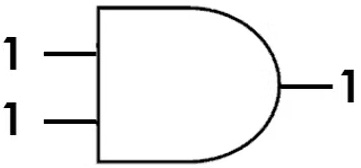
With an AND gate is both have a current then the output will also have a current. This can be written in a truth table. A truth table is a way of showing all the possibilities for a logic gate.

As you can see the output will only be TRUE (i.e. have a current) if both the inputs also have a current. If only one or none of the inputs has a current, then the output will be FALSE.
OR logic gate
The OR gate looks slightly different.
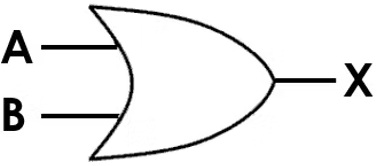
The shape is quite pointed near the output and the input side is curved. Some products will draw an inaccurate image which can be misleading to your students so it is worth looking at the shape of the OR gate before purchasing a product to make sure it is a true reflection of the correct shape the exam bard will use.

Let’s look at the output when we change the inputs. First of all, if both inputs are 0 the output will also be 0.
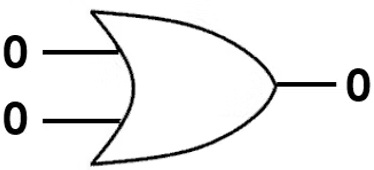
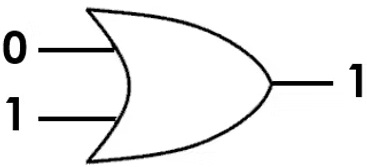
Next if B is 1 and A is 0, the output will be 1.
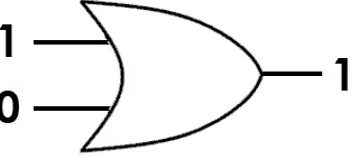
Alternatively, if A is 1 and B is 0 then the output will also be 1.
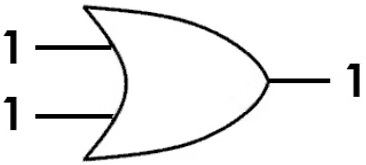
And finally, if both A and B are 1 then the output will also be 1.
Let’s see this in the truth table.

With an OR gate, if either input is TRUE then the output will be TRUE. If both inputs are TRUE the output will also be TRUE. It is only when both inputs are FALSE will the output will be FALSE.
NOT logic gate
The NOT only has a single input and a single output. It simply switches the signal so if it was TRUE it will become FALSE and visa versa.
Here is the NOT gate.
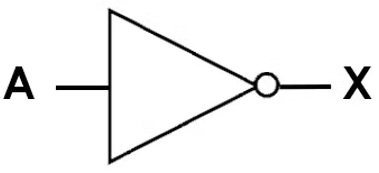
You’ll notice it is in the shape of a triangle but please also note the little circle at the end, that will become more useful later on.
So, with a NOT gate if the input is FALSE the output will be TRUE.
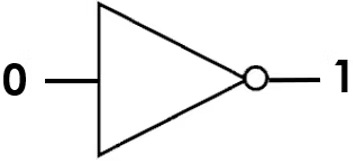
Alternatively, if the input is TRUE then the output will be... yes, you’ve guessed it, FALSE.
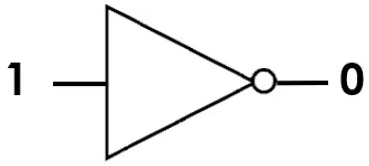
The truth table looks as follows.

NAND logic gate
As mentioned earlier, NAND is a combination of a NOT and an AND gate.
It looks like this...
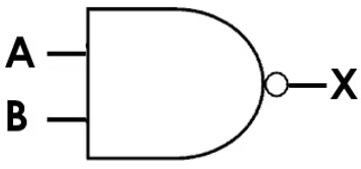
It is a combination of the AND gate (note the capital D) and it also has the little circle at the front (I told you it would be important). That circle changes the gate into a NOT version of that gate.
To work out the truth table first work out the AND part and then apply the NOT.

NOR logic gate
OK, so I’m sure you can probably work this one out for yourself but humour me here. In case anyone is not sure what the NOR gate would be, here is what is looks like...
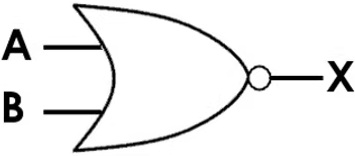
It is a combination of the OR gate and has a circle at the front to show it is the NOT version.
And to work out the truth table simply work out the OR part first and then flip it to show the NOT of each.

XOR logic gate
This is really an Exclusive OR, but it has been shortened to XOR. Here is what is looks like...

It looks like the OR gate but has a double line near the input. The logic is also slightly different to an OR, otherwise there would be not point in having a separate gate. With an OR if either of the inputs or both of the inputs are TRUE the output will be TRUE. However, with an Exclusive OR only if one or other of inputs are TRUE will the output be TRUE, however unlike the OR, if both of the outputs are TRUE the output will be FALSE.
Here is the truth table for an XOR logic gate.

XNOR logic gate
This is the NOT version of the XOR. Here is what is looks like...
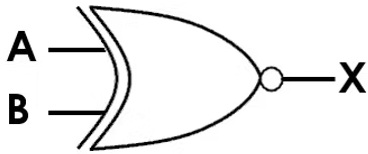
As with the other NOT gates, first workout the XOR and then apply the NOT to the output. Here is the truth table.

Notation
Phew, now you have an idea of what each of the gates mean and have seen the truth tables that accompany each, we can talk about the notation used.
You may assume that there was a standard notation that is used by all the exam boards, but sadly not.
Therefore, it is really important to make sure any resources you want to use in your classroom uses the correct notation for the exam board your students will be using. Let’s have a look at the notation.
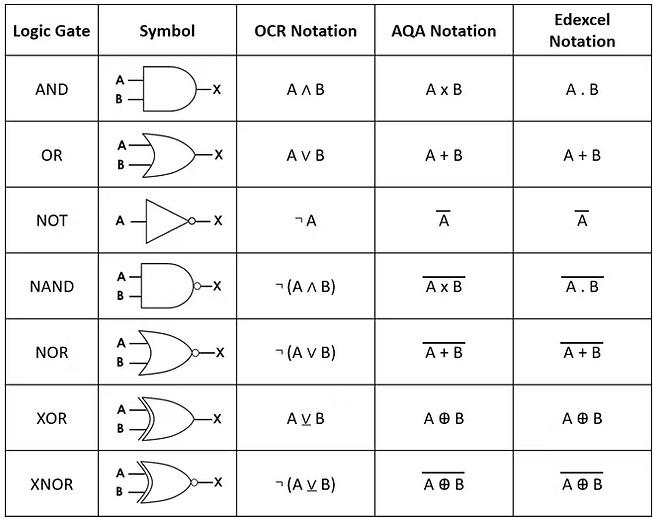
Logic notation isn’t usually used at GCSE level however in A-Level the notation is used more by the exam boards.
Therefore, pupils following an AND logic gate may see it written as...
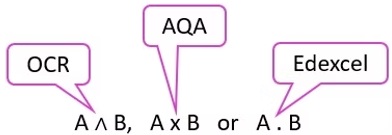
depending on the exam board they are following.
Some of the symbols can be tricky to enter so here is a quick guide to help you if you are entering them into Word or PowerPoint on a Windows computer. For the +, x or . you don’t need to enter a particular character and you can just type the correct character as usual using your keyboard.
To enter the other symbols, you will need to know the character codes which are shown in the following table:
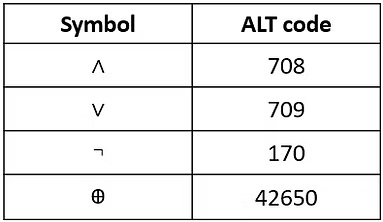
To insert these symbols in either Word or PowerPoint follow these steps:
Hold down your ALT key
Type in the ALT code number show in the table above, using your number pad. It will not work if you use the numbers at the top of your keyboard you must use the numbers on your number pad.
Release the ALT key
Your symbol should appear in your document or textbox.
Alternatively you can copy them from below and paste them into your documents:
∧
∨
¬
⊕
I haven’t found a quick way of getting the lines above the characters apart from drawing the lines using the line tool, however for the underline I simply highlight the character and use the normal underline formatting tool.
Teaching Strategies
Generally speaking, Key Stage 3 only need to learn about AND, OR and NOT. However, GCSE pupils may need to expand on this and will start moving into the other gates and combining gates.
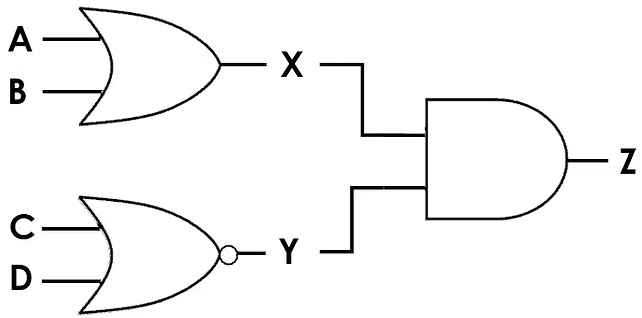
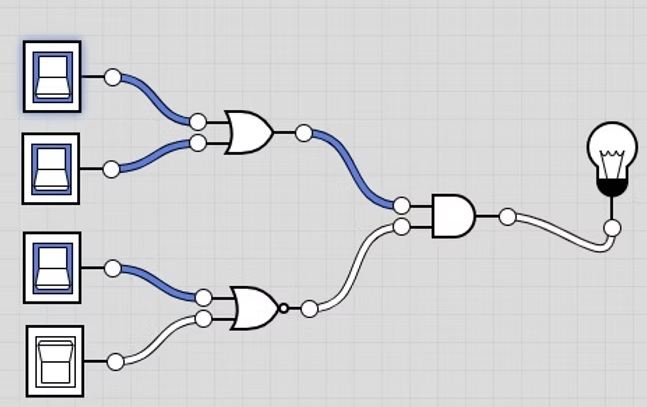
When you combine multiple logic gates, such as above, they are known as a logic circuit.
It can look quite daunting at first, but just take it one step at a time and it is far easier.
Start by creating a truth table that contains a column for each input and a column for each output. You may find not every output is shown on the logic circuit but really you need an output for each logic gate. Some pupils find it easier to put what each logic gate is showing and split up those that are NOT, NOT or XNOR. Here are my table headings for the logic circuit above.

Now to fill them in.
You will need to fill in all possible inputs. I find it easier to do this with binary counting. We have 4 possible inputs so count using 4 digits i.e.: 0000, 0001, 0010, 0011 etc.
Here is my table with the inputs filled in using the binary counting method.
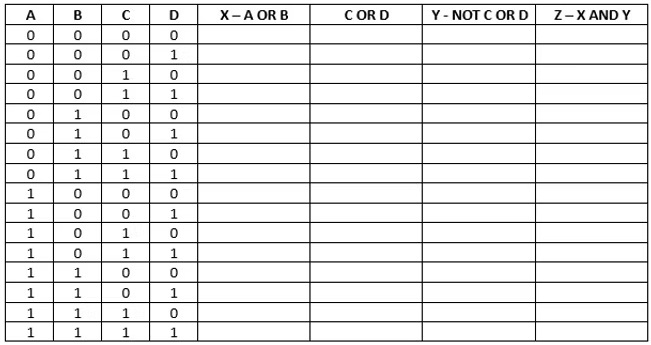
Now take each column, one at a time. For column X we are only comparing the A and B columns, so C and D can be ignored for now. We are looking for an OR so either or both A or B columns can contain 1 for the output in X to be 1. Here is my table with my first column filled in.
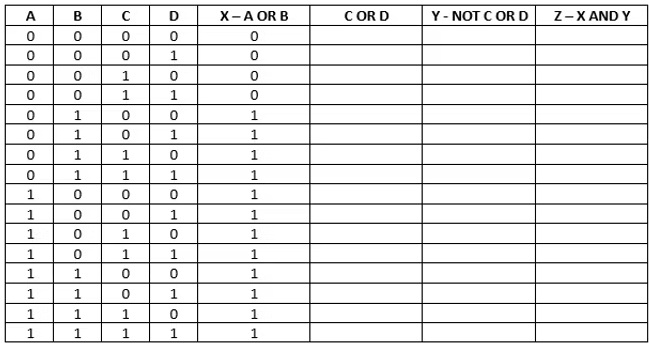
As the next gate between C and D is a NOR gate I’ve split it into 2 separate columns. First, we will search for C OR D.
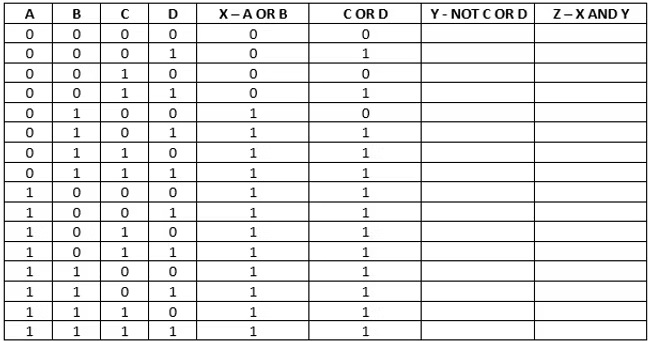
Now we can work out the Y column which is where we flip the output of the C OR D column so 1 becomes a 0 and 0 becomes a 1.
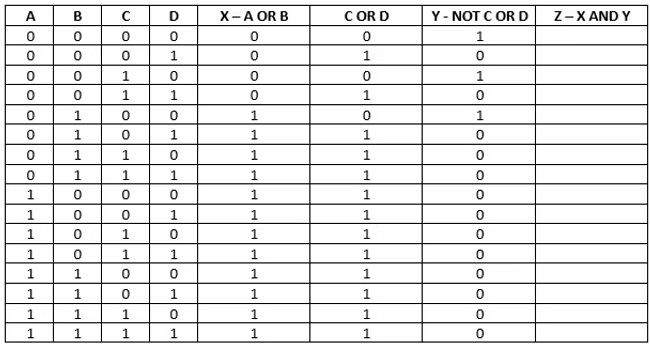
Finally, we can then work out the X output which is only looking at the X and Y columns and we need to ignore what is in all the other columns. This is an AND gate so both X and Y need to contain a 1 for the output to be a 1.
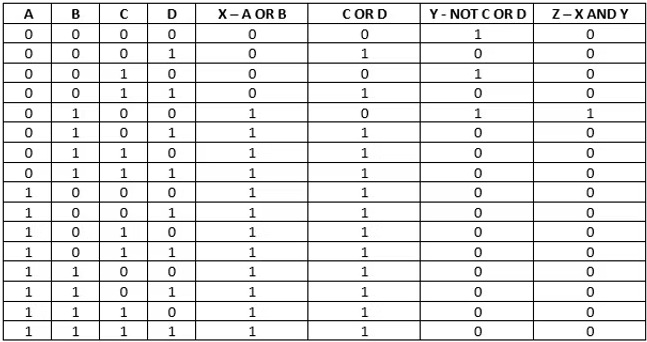
And there we have our completed truth table for the logic circuit we were looking at.
The secret to teaching logic gates and truth tables effectively
The key to teaching logic circuits and truth tables is consistency. Use the correct symbols and notations for your exam board and you can’t go too far wrong. I think that pupils get confused when they see alternative symbols and try to read too much into it rather than realising that it is just a badly drawn symbol.
Help them learn the basics and then teach them how to break down logic circuits into their individual elements and they will find them much easier.
Visual aids and teaching resources
It is so important to give your students plenty of practice, helping them get to grips with both drawing logic circuits and filling in truth tables.
There is a great online program you can use which enables students to build working logic circuits on screen. They can even join them to switches and lightbulbs to really demonstrate what happens with different inputs. It is available at https://logic.ly/demo/
Here is the same logic circuit we have just been looking at built using the logic.ly website with three switches turned on.
